
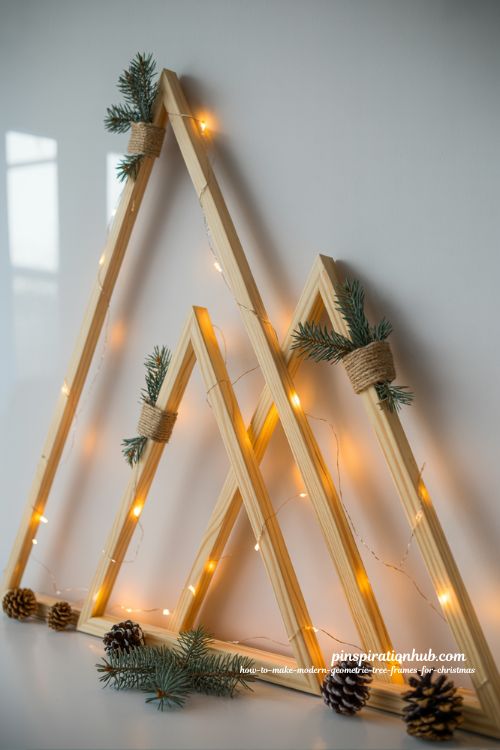
If you’ve ever stared at a blank wall in December and thought “I want a Christmas tree but I just don’t have the space” — this build is for you. Three open wooden triangles, lit with warm copper-wire fairy lights and dressed with pinecones, a few ornaments, and a sprig of fresh greenery. That’s the whole thing. And it looks genuinely beautiful against a wall.
The idea started as a Pinterest workaround for renters and small-space dwellers, but it has a way of becoming your favorite holiday decoration even when you do have room for a real tree. The frames store flat behind a bookshelf all year and come out every December looking exactly as sharp as the year before. One Saturday to build. Around $90 if you own a drill and a saw, closer to $160 if you’re buying tools.
- Three graduated triangles — 48, 36, and 28 inches tall — create a tree-line silhouette that reads as a small forest, not a lone symbol.
- Every cut uses one 15-degree saw setting, so you set the bevel once and don’t touch it again.
- Pocket-hole joinery keeps the corners tight through years of seasonal storage and handling.
Why Geometric Christmas Tree Frames Work So Well
There’s a reason this project has stayed popular on Pinterest for years while a lot of other DIY holiday trends have faded. The look is clean and modern, but it still feels warm when the lights come on. The open triangle silhouette gives you all the visual impact of a Christmas tree without the bulk, the mess, or the commitment — and it works in rooms where a real tree would just be awkward.
The graduated heights are the key detail. A single triangle on a wall reads like a sign for something. Three at different heights — 48 inches, 36 inches, and 28 inches — read as a tree line, and the staggered peaks trick the eye into seeing a miniature forest. If you genuinely only have room for one, build the 36-inch middle size and put it on the floor beside a chair rather than centered on a wall, where it starts to look like signage again.
| Frame | Height | Base Width | Leg Length (long-point to long-point) |
|---|---|---|---|
| Tall | 48 in | 26 in | 49-3/4 in |
| Medium | 36 in | 19 in | 37-1/4 in |
| Small | 28 in | 15 in | 29 in |
You need about 25 linear feet of 1×2 pine — four 8-foot boards with modest offcuts — and a single 15-degree bevel setting on your saw. That’s the entire geometry of the project.
What You Need to Build Modern Geometric Tree Frames for Christmas
Before you touch a saw, get the materials sorted. The cut list is short and the quantities are exact enough that there’s no real room to improvise on wood.
Materials:
- 4 boards of 1×2×8 ft select pine (straight grain, no large knots near cut points) — $15 to $24 each
- Titebond Original Wood Glue, 16 oz — $8 to $11
- Kreg pocket-hole screws, 1-1/4 in coarse, 100-count — $8 to $12
- Sandpaper assortment, 100/150/220 grit — $6 to $9
- Minwax Wood Finish in Pickled Oak, 1 quart (optional) — $14 to $18
- 3 strings of 33 ft 100-LED warm white copper-wire fairy lights, battery operated — $24 to $33 total
- Natural pinecones, 24-pack (2–3 in) — $12 to $16
- Gold glitter shatterproof ball ornaments, 6-pack — $15 to $22
- Natural jute twine, 2 mm — $5 to $8
- Fresh blue spruce or noble fir tips (ask at a tree lot for trimmings) — free to $5
Tools:
- Miter saw or compound miter saw set to 15-degree bevel
- Kreg Pocket-Hole Jig 320 with face clamp
- Cordless drill with #2 square driver
- Tape measure and pencil
Most readers already own a drill and some kind of saw, which puts the realistic out-of-pocket at around $150 total.
Step 1 — Pick Your Wood and Mark the Cut List
Hold each 1×2×8 board up to your eye and sight down the long edge like a rifle barrel. Reject anything with a visible bow, twist, or cup. Knots are fine as long as none of them sits within two inches of a corner where a pocket hole will land. Select pine runs $5 to $8 a board at Home Depot. The cheaper Spruce-Pine-Fir 1×2 works too, but it tends to cup indoors over time, which gets annoying once you’ve already cut everything.
Mark the full cut list on the boards before you start cutting. For each leg, you need a 15-degree cut at both ends leaning the same direction — the piece comes out as a long parallelogram in profile. For each base, the two 15-degree cuts converge inward, making a shallow trapezoid wide-face down, so the ends sit flush against the inside faces of the legs. The leg tops are not cut to a point. They overlap.
- Pick the straightest boards on the rack — sight down the edge before you buy
- Mark all 12 pieces on the boards before you make a single cut
- Keep your offcuts; the small triangular wedges double as apex sprig holders
Step 2 — Cut Everything at the Same 15-Degree Setting
Set the saw to 15 degrees, lock it, and leave it. Every single cut in this project is the same angle — you just flip the board to alternate which way the cut leans. Cut all six side legs first, then the three bases. The consistency matters because small errors compound across joints, and if your apex angle is off by half a degree on all three frames at least they’ll match.
Dry-fit each triangle on the floor before you drill a single pocket hole. Overlap the two leg tops and slide the base in between the legs near the bottom. If the corners won’t close with light hand pressure, something is off — find it now, not after you’ve driven the screws. Never try to force a joint closed with pocket screws. The wood will relax a month later and the gap will be back.
- Set the saw bevel to 15 degrees and never move it again for this project
- Dry-fit every triangle on the floor before committing to pocket holes
- Wait for the blade to fully stop before clearing sawdust or reaching near the guard
Step 3 — Assemble Each Triangle with Pocket-Hole Joinery
Pocket holes hide on the inside face of the frame — the face that catches the light — which is exactly where you don’t want visible screw heads. Set the Kreg 320 jig to the 3/4-inch material setting and drill two pocket holes per end of each base board, about 1/2 inch apart. That’s twelve holes across all three bases. Drill at full speed in one pass; pecking at it splinters the exit side.
Start with the apex. Lay the two legs flat, bring their tops together so one overlaps the other face-to-face, and align the 15-degree top cuts so the outer edges form a clean peak of about 30 degrees. Run a thin bead of Titebond Original along the overlap, clamp it, and drive two 1-1/4 in Kreg coarse screws through the back of the lap. Wipe squeeze-out within five minutes with a damp rag — once it skins over, you’re sanding it off, and that’s a worse job.
Then slide the base up between the two legs so the 15-degree ends sit flat against the inside faces of the legs near the bottom. Glue, then drive two pocket screws from each base end into the leg. Six screws per frame, eighteen total across the trio.
- Use coarse-thread Kreg screws in softwood — fine threads strip out
- Drive the screw until the head sits flush with the bottom of the pocket, then stop
- Build all three frames the same day so any minor saw drift is consistent across the set
Step 4 — Sand and Finish the Frames
Work through 100-grit to knock down the saw marks at the joints, 150 across all four faces, and a quick 220 pass along the edges that face into the room. Run a fingernail along each joint — if it catches, sand again. Any squeeze-out you missed will resist stain and show up as a pale blotch.
Raw sanded pine yellows over a season and can start to fight pale white oak flooring or LVP. If you want the cooler tone that reads as modern, wipe one coat of Minwax Pickled Oak onto the wood, let it sit five to ten minutes, then wipe off the excess with a clean cotton rag. Two hours dry. A second coat if you want it darker. Skip polyurethane — these frames live indoors and won’t see hands or wet glasses.
- 100-grit at joints, 150 overall, 220 on room-facing edges
- Pickled Oak cools pine’s pink-orange undertone without going gray
- Let the stain dry overnight before adding lights — touch-dry in two hours but the odor lingers
Step 5 — Wire in the Fairy Lights
One 33-foot string of 100 warm-white LEDs covers a frame with plenty of slack. Tape the battery box to the back of the base rail with clear gaffer’s tape (not masking tape, which yellows and peels), then run the lead wire up the inside back edge of one leg. How you distribute the lights from there actually changes the whole look, so it’s worth thinking about.
The denser-at-the-base effect comes from wrapping the lights around the wood at the bottom and letting them drape vertically across the open interior like a curtain. The cleaner architectural version runs them in a single line straight up one leg, across the apex, and back down the other. The best version of this project uses the draped method on the largest frame and the cleaner wrap on the two smaller ones. Three identical light treatments read as monotonous; two reads as composed.
Set the included remote to the 6-hours-on-18-hours-off timer so the frames light up at the same time every evening automatically. Replace batteries on December 26.
- Tape lights to the back face of the frame at each corner — the copper wire can cut through its own insulation against a screw head
- Draped lights on the large frame, clean wrap on the two smaller ones
- Set the timer and replace batteries proactively — cold rooms drain alkaline cells faster than warm ones
Step 6 — Style with Greenery, Pinecones, and Ornaments
Three elements only: greenery at the apex, ornaments hanging inside the large frame, and pinecones piled at the base. Add a fourth element and the frames start looking like a craft store display rather than intentional decor.
Stuff a small tuft of fresh blue spruce or noble fir into the apex of each frame so it pokes three to four inches above the peak, fanned slightly. Tree lots will give you the trimmings for nothing if you ask when they’re shaping trunks — the offcuts go in the bin anyway. Cut three to five lengths of jute twine in varying lengths from 6 to 14 inches and hang glitter ornaments from the top inside edge of the large frame only. Stagger the heights — two ornaments at the same length looks like an accident. Pile cleaned pinecones inside the base of each frame, denser at the larger frames, two or three at the smallest, and nestle a single oversized shatterproof sphere among the cones.
- Only the largest frame gets hanging ornaments — loading all three reads as busy
- Use shatterproof plastic for anything hanging from twine; glass goes on the floor at the base
- Ask tree lots for trimmings — they’re usually free and fresher than anything you’d buy
Common Mistakes That Ruin the Build
| Mistake | What Happens | Fix |
|---|---|---|
| Mismatched cuts | Base corners won’t close, peak sits crooked | Dry-fit before drilling; recut the bad piece |
| Pocket holes on wrong face | Visible from across the room | Always drill on inside face only |
| Skipping the glue | Joints creak when you pick up the frame | Glue + screws, never screws alone |
| Heavy ornaments on thin twine | Ornaments fall within weeks | Shatterproof plastic only for hanging pieces |
| Lights over corner joints | Wire insulation cuts on screw head | Tape lights to back face at each corner |
| Building just one frame | Looks stranded, reads like signage | Always build the trio |
FAQ
How long does it take to build the geometric Christmas tree frames?
One Saturday is genuinely enough. Cutting and drilling takes the morning, assembly and glue cure takes the early afternoon, and sanding and staining wraps up by mid-afternoon. Let the stain dry overnight, then spend Sunday morning adding lights and styling. The build-day breakdown in the original instructions maps it hour by hour if you want a precise schedule.
Do I need a pocket-hole jig to make modern geometric tree frames for Christmas?
You don’t strictly need one — you can glue the pieces together and the structure will hold since the frames don’t carry any meaningful weight. But pocket-hole joinery is what keeps the corners tight after years of dragging the frames in and out of storage every December. The Kreg 320 jig costs $45 to $60 and is worth it if you do any amount of light woodworking.
What size should I build if I only have room for one frame?
The 36-inch medium frame is the most versatile. Put it on the floor next to a chair rather than centered on a blank wall — centered, a single triangle reads like a symbol or a sign for something. Off to one side next to furniture, it reads as intentional decor.
What stain works best on pine for a modern look?
Minwax Pickled Oak is the best single option for pine that needs to look more like white oak. It cools the pink-orange undertone without going gray, which keeps the frames looking modern against pale flooring. One coat is usually enough; two if you want it darker. Skip any topcoat — these frames live indoors and don’t need it.
Can I use artificial greenery at the apex instead of fresh sprigs?
Fresh is better for the apex because the contrast between clean geometric lines and one slightly-wild piece of nature is what makes the look work. Fake greenery kills that contrast. That said, if your fresh sprig dries out by week two, a small faux tip tucked behind it will maintain the silhouette without anyone noticing. Nobody looks that closely.
How do I store the frames after the holidays?
Store them flat — behind a sofa, against the back wall of a closet, or behind a bookshelf. Coil the fairy lights and tape them to the base rail of each frame so they don’t tangle in storage. The frames themselves take up almost no space when stored flat, which is honestly part of why this project is worth building.